Quilt Ruler Connector / Handle
for your acrylic rulers
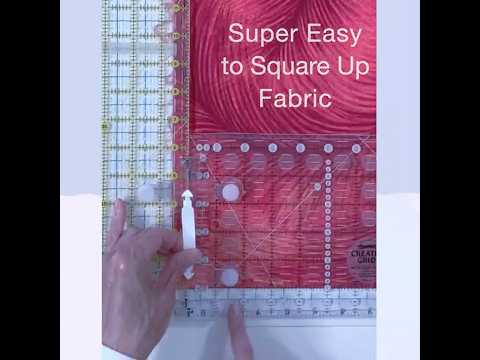
1) Square up fabric the super easy way
2) Use it as a handle
3) Connect your rulers (6" or wider) to cut wider or longer pieces
Sold out
1) Square Up Fabric
the Super Easy Way!
Made of Polycarbonate, virtually unbreakable | Left-Handed Friendly |
- Premium Suction Cups and built-in Handle
2) Use it as a Handle

▶️
3) Cut wider or longer

Easily Align and
Connect Your Rulers
Left-Handed Friendly
You want the edge you'll be cutting on to be perfectly smooth after connecting your rulers.
The Alignment Tabs and Lip Edge
make it easy to align and connect rulers that are the same width, so the edge you cut on is perfectly smooth.
Note: For best results, make sure the surfaces of the rulers are clean and moisten the suction cups.
Sold out
Square up fabric
the Super Easy Way:

Use as a Handle:

Do more with the regular acrylic rulers you already have!
1) Square up fabric the super easy way
2) Use it as a handle
3) Connect your rulers (6" or wider) to cut wider or longer pieces
1) Square Up Fabric the Super Easy Way!
- Made of virtually unbreakable Polycarbonate
- Left-Handed Friendly
- Premium Suction Cups and
built-in Handle - Click here for replacement suction cups.
- Made of virtually unbreakable Polycarbonate
2) Use it as a Handle
▶️
Quilt Ruler Upgrade Kit
3) Cut Wider or Longer Pieces!
Grip Strips
You want the edge you'll be cutting on to be perfectly smooth after connecting your rulers.
The Quilt Ruler Connector has:
-
-
- Alignment Tabs
- Lip Edge
-
They make it easy to align and connect rulers that are the same width, so the edge you cut on is perfectly smooth.

Take Two 12" Rulers and a Connector to a Class or a Retreat
You need a 24" long ruler to cut the full width of fabric but it's always sticking out of the top of a bag if you need to take it to a class.
With the Quilt Ruler Connector you can take two 12” long rulers, that will fit in a small bag or even in the case with your sewing machine, to a class or retreat and then make a 24” long ruler when needed.
Click Here to see the 2-Ruler Set
You can also connect them side-by-side to cut wider pieces or even as a corner square to square up your fabric.
Check out: Make a Corner Square to Square Up Your Fabric the Super Easy Way below
Turn Two 12" Rulers into a 24"
The full width of fabric folded once is about 22", so you'll need a 24" ruler to cut strips. Rather than taking a too-big-to-fit 24" ruler to a class or retreat, you can take two 6"x12" rulers and connect them end-to-end.
After cutting the strips, you can take the rulers apart and use one 12" ruler to cut the strips into squares.
It will be much easier to get accurate results if you first Slip-Proof your rulers with Grip Strips.
Make a 3-Foot Ruler
Sometimes a 3-Foot Ruler is
Just What You Need
It’s ideal to have a 3-foot long ruler to cut bias binding strips. But carrying or storing a ruler that long would be a major hassle.
Just connect your 12” and 24” rulers end-to-end, and you'll be able to cut on the diagonal across the full width of fabric folded once to cut bias binding strips.
You can even connect two 24" rulers end-to-end to make a 4-foot ruler to square up the edges of a large quilt.
Connect Rulers Side-by-Side
With just two 6"x12" rulers and a connector, you can cut pieces up to 12" wide.
The example below shows cutting a 9½" square.
Whatever measurement you line up to on the second ruler, the entire width you'll be cutting will be that measurement plus the 6" of the first ruler.
Cut Wider Pieces
To cut wider pieces from the full width of fabric folded once, you could connect two 24" rulers side-by-side or connect a 12" & 24" ruler as shown below.
This will work as long as the fabric is accurately squared up to start with. Check out the section below: "Make a Corner Square to Square Up Your Fabric the Super Easy Way".
A Big Right Angle Is Just What You Need:
Make a corner square with your 12" & 24" long rulers.
If you have two 24" long rulers, you can make an even bigger corner square.
You'll have to cut around the 2" Lip Edge on the Connector.
Then, slide the rulers up, keeping the edge aligned, until you can cut the unfinished portion.
Suction Cups & Handle
If you need the suction cups to hold longer, get them wet.
If the surface of your ruler is
clean & free from scratches
Suction cups work by creating a vacuum when you press them down. They will stay attached until air leaks in.
That's why you want to make sure your ruler is clean and free of scratches so it can create a tight seal.
If you put a drop of water on them, the water will keep air from leaking in until it completely evaporates. With a drop of water on them, they can last for several days.
Replacement Parts
3-Pack of Replacement Suction Cups with Locking Tops
3 Repacement Suction Cups: $2.99
To Replace a Worn or Damaged Suction Cup
Handle
Angle the Handle, so you can push the hook on one side through the loop on top of the Connector. Then straighten the Handle as you push the hook on the other side through.
You'll have to twist it a little, but do the same thing to hook it in on the other end.
Guidelines4Quilting
© 2026 Guidelines4Quilting All rights reserved.